To securely process payment setup on your property, we use Stripe’s Restricted API Key instead of the full Secret Key. A restricted key limits access to only the specific Stripe features needed — in this case, managing Setup Intents for saving payment methods.
This guide walks you through creating a restricted key in your Stripe Dashboard.
Prerequisites #
- A Stripe account (live or test mode)
- Access to your Stripe Dashboard at https://dashboard.stripe.com
Step-by-Step Instructions #
Step 1: Open the API Keys Page #
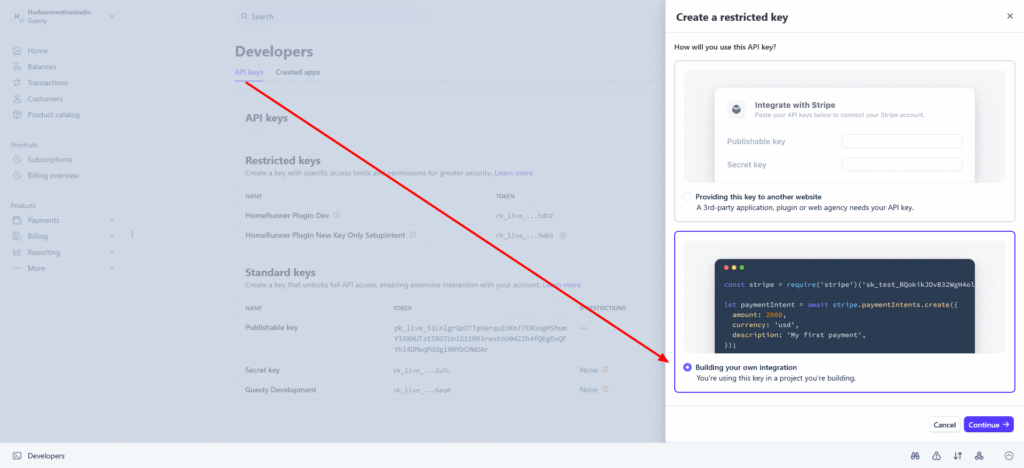
Log in to your Stripe Dashboard and navigate to Developers → API keys. You can also go directly to https://dashboard.stripe.com/apikeys.
Make sure you are in the correct mode — Live mode for production or Test mode for testing. You can toggle between modes using the switch at the top of the Dashboard.
Step 2: Create a Restricted Key #
Click the Create restricted key button.
You will be asked to choose between two options. Select Building your own integration and click Continue.
Step 3: Name Your Key #
Give your key a descriptive name so you can identify it later. For example:
HomeRunner - 3dsHomeRunner - Setup Intents
Step 4: Set Permissions #
You will see a list of Stripe resources with permission levels. Set all resources to None except for the following:
| Resource | Permission |
|---|---|
| Payment Intents | Write |
Leave all other resources set to None. The Write permission on Setup Intents allows both creating and reading Setup Intents, which is all that is needed.
Step 5: Create the Key #
Click Create key to generate your restricted key.
Stripe will display your new restricted key. It starts with rk_live_ (live mode) or rk_test_ (test mode). Copy the key immediately — Stripe will not show the full key again after you leave this page.
Verifying Your Key #
After adding the key, you can verify it is working correctly by attempting to add a payment method on your property’s booking page. If the setup form loads successfully, your key is configured correctly.
If you see an error message such as “Stripe API key is invalid” or “Stripe API key does not have sufficient permissions,” double-check that:
- You copied the full key without any extra spaces.
- The key has Write permission for Setup Intents.
- The key matches your mode — use a live key for production and a test key for testing.
Frequently Asked Questions #
Why use a restricted key instead of a secret key?
A restricted key follows the security principle of least privilege. If a restricted key is ever compromised, it can only access the specific resources you’ve permitted — not your entire Stripe account. This protects against unauthorized refunds, payouts, or account changes.
Can I use the same restricted key for multiple properties?
Only if the properties share the same Stripe account. Each Stripe account requires its own restricted key.
How do I revoke a restricted key?
Go to Developers → API keys in your Stripe Dashboard, find the restricted key, click the … menu, and select Delete key. After revoking, you will need to generate a new key and update your property settings.
I lost my restricted key. What do I do?
Stripe only shows the full key once at creation. If you’ve lost it, simply delete the old key and create a new one following the steps above. Then update your property settings with the new key.